Grade 6 Electricity Experiment
Light Bulb Experiment Using Battery
Curriculum Expectations
Overall Expectation:
Specific Expectations:
This activity was chosen based on having experience participating in it previously. It was then researched and learned how to instruct the activity to grade six students.
- demonstrate an understanding of the principles of electrical energy and its transformation into and from other forms of energy
Specific Expectations:
- 2.4- design, build and test a device that produces electricity
- 2.5- use technological problem-solving skills to design, build, and test a device that transforms electrical energy into another form of energy in order to perform a function
- 2.6- use appropriate science and technology vocabulary, including current, battery, circuit, transform, static, electrostatic and energy, in oral and written communication
This activity was chosen based on having experience participating in it previously. It was then researched and learned how to instruct the activity to grade six students.
Criteria for using the demo
This demo would be done in a science lesson that was designated to be a 'hands-on' lesson. It would be demonstrated at the beginning of the lesson by the instructor to show students what will be expected. Students will then be broken up into groups of three or four to conduct the experiment on their own. The groups are necessary because it requires a number of hands to ensure all pieces of the model are held in place. This lesson could be completed in the middle of the unit, as electrical circuits are being taught.
Equipment Needed
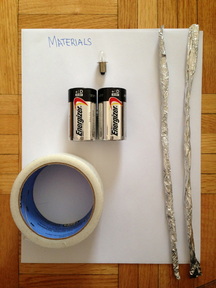
- aluminum foil
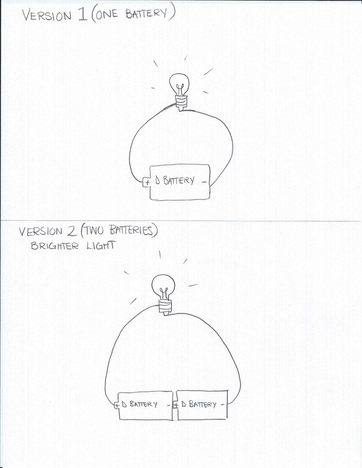
- 1 or 2 D battery(ies) depending on how bright you want the light to shine
- a small Flashlight lightbulb (around 4.8V)
- Electrical tape or Duct tape (to hold everything together)
Required Background Informational
Students need to have an understanding of how electricity works. They explore the characteristics of static and current electricity, students discover the characteristics of conductors, insulators, switches, batteries, light bulbs and electromagnets.
MEthodology/Procedure
Step 1
PRE-EXPIREMENT:
Ask students can draw what they think the circuit will look like. Tell the students that they have to make the electricity go in a circle (circuit). Emphasize that the wires should not cross, because if they
cross the circuit will be interrupted.
Ask students can draw what they think the circuit will look like. Tell the students that they have to make the electricity go in a circle (circuit). Emphasize that the wires should not cross, because if they
cross the circuit will be interrupted.
step 2
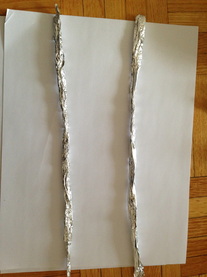
Fashion wires out of the aluminum foil by rolling the foil into two long, thing wire-type pieces
Step 3
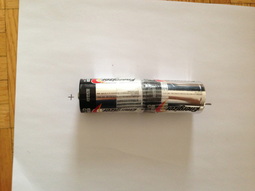
Link your batteries. To connect the batteries, place the positive terminal, or the end with the nub, of one battery against the negative terminal, or the flat end, of the other. Tape the batteries together with electrical tape, making sure they remain touching.
Step 4
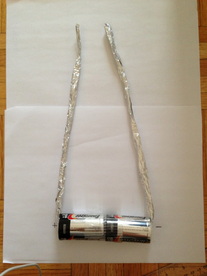
Have the students attach the batteries to the foil. One wire should connect to the positive battery terminal, the other to the negative battery terminal. The actual metal of the wire must touch the terminal. Use electrical tape to hold the end of the wires into place.
Step 5
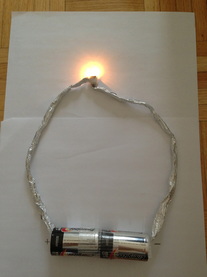
Attach one foil at one end of the battery, bringing it up to touch the bottom of the light bulb. Attach the second foil to the other end of the battery, bringing it up to touch the ridged side of the light bulb. Light bulb should light up!
Do not worry if your experiment does not light up the first time. There are several reasons for this:
- Make sure that one wire is attached to the ridged (threaded) part and the other is attached to the base.
- You want to make sure that wires do not cross. This will interrupt the circuit and the electricity will not get to the light bulb.
- You want to make sure you have the proper voltage.
- Make sure the experiment is taken apart because this could create a fire hazard and the batteries could heat up over time.
Safety Concerns
- Ensure the working surface has been cleared of any other possible conductors.
- Battery and light bulbs should be in good condition and ready to use.
- Make sure the experiment is taken apart because this could create a fire hazard and the batteries could heat up over time.
Follow-up activities/extensions/discussions
• Have students brainstorm different conductors or insulators at home or in your classroom to create a different circuit
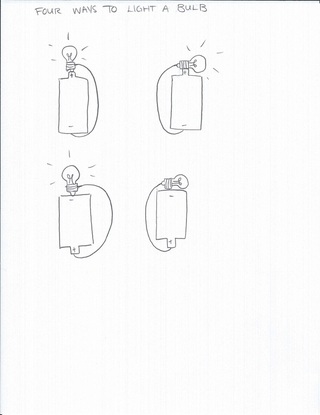
• Have students come up with Different ways to light up the bulb (Refer to picture for example)
• Have students brainstorm larger circuits used in everyday life and how
Two Cross-curricular Connections
- Language Arts: Students can create a new circuit and write an instruction manual on how this circuit works. Students should be aware of punctuation and grammar when writing.
- Religion: Students will reflect on the importance of electricity in their everyday lives. The privilege of electricity for most people should be discussed, as well as the responsibility to conserve and be grateful for electricity. Students should also reflect on how difficult their lives would be without electricity, and discuss how other communities live without it.
Considerations for ELLs
- ELL students should be given plenty of visual diagrams to explain what the concept of the lesson is
- Teachers could come up with a vocabulary list of key words that will be used throughout the activity and translate it for the ELL learners
- If a translator is available in the school, the teacher can see if they are available for the day of the experiment
- This experiment is very hands-on in nature, and should display the ideas of electrical currents just through completing the activity
